I saw on Pinterest a while back a few assorted ideas for making tomato cage Christmas trees so I figured "hey, I've got some tomato cages and tons of clearance Christmas garland and decorations...I'm gonna try this!" One day when a friend was over, we wrapped the lights around, then wrapped the garland, and added some balls and snowflakes. (If I do it again I will buy more greenery so I can fill it in more densely. It doesn't look bad, but it could look better) It didn't quite look finished so I went back and added some ribbon later. I'll have to try for better pics some time, but I think they turned out great!!
Monday, 26 November 2012
Christmas Lantern
A while back I bought this plain old black outdoor lantern on clearance at WalMart for $3. At the time I had no idea what I was going to do with it. Well, 3 months later I figured it out. I filled it full of assorted Christmas balls and stuck a couple peacock feathers in for good measure, tied some ribbon on top and....Voila! Christmas decoration! (and I only ended up bleeding on one ornament after I dropped one and it shattered)
Friday, 26 October 2012
Baby Shower Cake!
A friend asked me to bake a cake for a baby shower, and of course I'm not going to say no. I love baking! She requested zebra print and left the rest up to me...although she did manage to score a deal on some Wilton Sugar Sheets in an awesome zebra print that made my life so much easier! I thought to myself "you know what would be awesome? If the cake itself was zebra print when you cut into it!" Of course I really had no idea how to do this so I guessed, and (unfortunately I didn't get any pictures from when it was cut into, as it was at someone else's house at a baby shower I wasn't at) according to the guests, it worked perfectly!
I baked 4 little mini cupcakes and wrote the baby's name on them and they were set on top after the cake got there. So cute!
Notes on using sugar sheets: It was my first time using them but I have used frosting sheets before. Basically the same thing. Cut them carefully and make sure they aren't too dry or they won't peel nicely from the backing. If you find they are too dry and are cracking and not peeling off the paper nicely, stick a damp paper towel between the backing sheet and the package (not on the sugar side) and zip it shut for about half an hour. It makes a HUGE difference! Crumb coat your cake and then slather on the frosting nice and thick. For this cake I used about 6 cups of frosting (including between the layers). This 2 layer cake was 8"x8"x4" and took 2 sugar sheets to cover the sides and the top. If you are putting them on a cake you had previously frozen to crumb coat they may sweat some as the cake warms up. No big deal, just something that happens.
P.s. This is what the baked layers looked like before I put it together.
I baked 4 little mini cupcakes and wrote the baby's name on them and they were set on top after the cake got there. So cute!
Notes on using sugar sheets: It was my first time using them but I have used frosting sheets before. Basically the same thing. Cut them carefully and make sure they aren't too dry or they won't peel nicely from the backing. If you find they are too dry and are cracking and not peeling off the paper nicely, stick a damp paper towel between the backing sheet and the package (not on the sugar side) and zip it shut for about half an hour. It makes a HUGE difference! Crumb coat your cake and then slather on the frosting nice and thick. For this cake I used about 6 cups of frosting (including between the layers). This 2 layer cake was 8"x8"x4" and took 2 sugar sheets to cover the sides and the top. If you are putting them on a cake you had previously frozen to crumb coat they may sweat some as the cake warms up. No big deal, just something that happens.
P.s. This is what the baked layers looked like before I put it together.
Saturday, 6 October 2012
Pinteresting Pumpkin Cookies
I admit it. I am a Pinterest junkie. If I could spend hours on there, I would. Also, I wish there was a button I could click when I actually complete a pin and I would be rewarded with a round of applause! My most recent success was with a batch of pumpkin cookies. It was soooo hard to only eat two and make sure that there will be some left for Thanksgiving supper with my family! I will definitely be making these again! Thumbs up delish!
Original pin links up with MyBakingAddiction:
My results:
Fluffy pumpkin batter
Baked cookies were not pretty on top, but that is what icing is for!
Mmmmmm yummy! (it was hard to stop nibbling to take the picture!)
Wednesday, 3 October 2012
New Shoes Day!
New shoe day is equally as fantastic as new purse day...I think... If it came down to one or the other though, I would have to choose new shoes. They are even better when they are a surprise find, and better still when they are on for an amazing price! The Zellers stores in Canada are closing soon so all their stores are having blowout sales. I went to check out one near us and found they had gotten in a TON of fantastic things from The Bay to blow out during their sale! There were gorgeous Calvin Klein dresses, cute blazers and other things that I now forget about because of just how awesome the deals on the shoes were! There were Kenneth Cole, Nine West, and many many other fantastic brands marked down drastically. My favorite find however, was this fantastic pair of Hopskotch2 heels from G by Guess. These babies are amazing! I think I peed a little when I saw that they had been tagged at just $29.99 with an additional 20% off sale on! Seriously? These beauties are regular $70! Thank You Shoe Gods!!! I got some other things on sale cheap too, but none worth mentioning compared to this! hehehe.
Saturday, 29 September 2012
I only ALMOST burnt the house down, Honey!
Inspiration struck me, or rather "Pin"spiration when I stumbled across this fantastic idea on Pinterest. (Isn't that how all the best stories start?)
Original Pin:
What I ended up with was similar but definitely not as professional. (and still needs some tweaking)
This frame looked like wood. Boy was I wrong! Totally plastic! The inside part to keep the back from touching the frame (I'm sure there is a technical term for that) totally looked like wood. (more like particleboard I guess) Again, very wrong. Totally cardboard! I thought I would just make a slice with the angle grinder in the top to make the hole for items to get dropped into. Yeah not going to do that again. My house was FULL of smoke! I am so glad hubby was at work, or he may not want me going near power tools again after that! haha.. Anyhow, I ended up with a horrible melted mess at the top of the frame where I cut the hole, and didn't get it all cut the way I wanted it.
I ended up with some jagged edges I'm going to have to try to sand down somehow. When I try to drop in ticket stubs etc. they get caught and don't fall in the way I want them to. Also, the backing in this particular frame is a strange sort of cloth material that really grabs hold of all the perforated edges of the tickets. That is why there is a zoo ticket stub just hanging out in the middle of the frame!
I still love it though. It serves its purpose of being a place to stuff things I want to save, without taking up space in my junk drawer. Now I just have to go through all my junk drawers and find all the stuff I saved to put in there!
Original Pin:
![]() |
| http://pinterest.com/pin/198299189813518706/ |
What I ended up with was similar but definitely not as professional. (and still needs some tweaking)
I learned a few lessons while making this;
- Even though something looks and feels like wood, doesn't make it wood.
- Plastic melts super fast and stinks really bad
- cardboard smokes and starts on fire quite easily
This frame looked like wood. Boy was I wrong! Totally plastic! The inside part to keep the back from touching the frame (I'm sure there is a technical term for that) totally looked like wood. (more like particleboard I guess) Again, very wrong. Totally cardboard! I thought I would just make a slice with the angle grinder in the top to make the hole for items to get dropped into. Yeah not going to do that again. My house was FULL of smoke! I am so glad hubby was at work, or he may not want me going near power tools again after that! haha.. Anyhow, I ended up with a horrible melted mess at the top of the frame where I cut the hole, and didn't get it all cut the way I wanted it.
I ended up with some jagged edges I'm going to have to try to sand down somehow. When I try to drop in ticket stubs etc. they get caught and don't fall in the way I want them to. Also, the backing in this particular frame is a strange sort of cloth material that really grabs hold of all the perforated edges of the tickets. That is why there is a zoo ticket stub just hanging out in the middle of the frame!
I still love it though. It serves its purpose of being a place to stuff things I want to save, without taking up space in my junk drawer. Now I just have to go through all my junk drawers and find all the stuff I saved to put in there!
Thrifty Harvest Wreath
I love wreaths. I wish I could have an excuse to have one up all year around. I really wanted to keep my son busy this morning, so we set out to make a Harvest/Thanksgiving wreath out of crafty materials I picked up on clearance throughout the year.
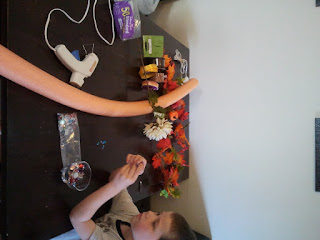
Here is the mess of a table that we started with:
Yep. That is a pool noodle! I bought it on clearance for 25 cents this fall. Great jumping off point for us since it is already orange! Tape the two ends together with clear packing tape, and Voila! Wreath shape!
Start adding whatever decorations you like. I chose a couple different kinds of ribbon. (I love animal prints)
Burn yourself a few times on the hot glue gun, because really, you haven't done a craft properly unless you burn yourself or something else! hahaha.
Add some leafy pieces next. (I got my strand of leaves with little pumpkins and berries attached on clearance for 2 bucks after Thanksgiving last year) I wrapped it around and around and then pulled off the leaves that were on the back side, then glued them to the front side.
Next I had to come up with something to attach it to the door since the pool noodle is too fat to sit in one of my wreath hooks nicely. I took and made a large loop of ribbon in one of the colors I already used and attached it at the top with hot glue.
Almost done. Next step was to let my son have fun with some gemstones. He isn't old enough yet to use the glue gun, so I gave him a roll of Glue Dots and a bag of gems and let him just stick them on wherever he felt like. He is all about things being symmetrical so he was very careful to evenly space them and put the same colors in the same places on all sides of the wreath. (Yes he probably gets that from me)
It was missing something. I didn't know what, so I stared at it for a while. Then a while longer. Then it hit me. It just needed a flower. So we glued on a flower and stuck some of the berries from the leafy strand in the center. Then we hung it up by sticking a really strong magnet inside the loop of ribbon at the top and sticking it to our (metal) door.
And just because I love playing with Instagram:
All together I think this project ended up costing about $8. (mostly in the cost of the pretty ribbon) I can handle that!
Here is the mess of a table that we started with:
Yep. That is a pool noodle! I bought it on clearance for 25 cents this fall. Great jumping off point for us since it is already orange! Tape the two ends together with clear packing tape, and Voila! Wreath shape!
Start adding whatever decorations you like. I chose a couple different kinds of ribbon. (I love animal prints)
Burn yourself a few times on the hot glue gun, because really, you haven't done a craft properly unless you burn yourself or something else! hahaha.
Add some leafy pieces next. (I got my strand of leaves with little pumpkins and berries attached on clearance for 2 bucks after Thanksgiving last year) I wrapped it around and around and then pulled off the leaves that were on the back side, then glued them to the front side.
Almost done. Next step was to let my son have fun with some gemstones. He isn't old enough yet to use the glue gun, so I gave him a roll of Glue Dots and a bag of gems and let him just stick them on wherever he felt like. He is all about things being symmetrical so he was very careful to evenly space them and put the same colors in the same places on all sides of the wreath. (Yes he probably gets that from me)
It was missing something. I didn't know what, so I stared at it for a while. Then a while longer. Then it hit me. It just needed a flower. So we glued on a flower and stuck some of the berries from the leafy strand in the center. Then we hung it up by sticking a really strong magnet inside the loop of ribbon at the top and sticking it to our (metal) door.
And just because I love playing with Instagram:
Subscribe to:
Posts (Atom)